There are so many Nendoroids I wish we had. However, customizing a Nendoroid always felt like a far-fetched dream. Until I saw him.

Most people probably see him as a grail Nendoroid, considering how high his after-market value is. However, his hair sculpt reminded me of a certain man’s messy hair when he has his hat off.

I always find that the hardest part of customizing a Nendoroid is the hair sculpt, because shaping a 3D mold into the perfect chibi impression of the character takes creativity, skill, and patience. I most definitely am not able to do this, but I’m trying to learn. Baby steps.
Since I’m not skilled enough to make custom hair sculpts yet, I can only rely on what’s available first. Despite the crazy prices of the Kogami Nendoroid, I managed to snag a second-hand one locally for less than $100. This makes having a One Piece Nendoroid, not so far of a dream.
The Base
For this custom Nendoroid exercise, I used the Almond Milk Nendoroid Doll Customizable Head, because I happened to have one. For the body, I did not have a Customisable Nendoroid Body, however, I have an Inosuke Nendoroid Doll. This was one of the figures I kind of bought on impulse. Also, given how low this poor boy has binned, it won’t be easy to sell him. Hence I decided to use him for my first custom.
The Face
I may not be able to do 3D sculpts, but 2D art I can do. First I need a reference image to make the face. I quite like this face of Law eating because of how comical it is, however, it seems impossible for current me to make the bulge of his cheeks. In the future, once I master the craft of customizing 3D sculpts, perhaps I could make this face.

Alternatively, I may have to find another eating face sculpt to work over. Perhaps one like Rengoku’s eating face.

But I don’t want to sacrifice Rengoku. :’) Instead, I decided to go with something simple first.

I used Photoshop to draw out a simplified version of this face for the Nendoroid. I made a layer over the image and traced the shape of the eyes, the eyebrows, and the pupils. Law usually has grey eyes in the anime, but I’ve noticed that Japanese fan artists like to color Law’s iris yellow. I quite like this color on him, because his clothes usually have this tint of color to match.


Making Vector Images
With the face done in Photoshop, I then put it in Illustrator and use ImageTrace to generate a vector image. This makes the lines less pixelated.
I’m not an Illustrator expert (hence the reason why I use Photoshop first for the face), but I think this website explains the process to use the function of this tool quite well.
The Same Process for Tattoos
Besides the face, another unique feature of Law is his many body tattoos. I found some reference images of all of Law’s tattoos and converted them into vector images as well.
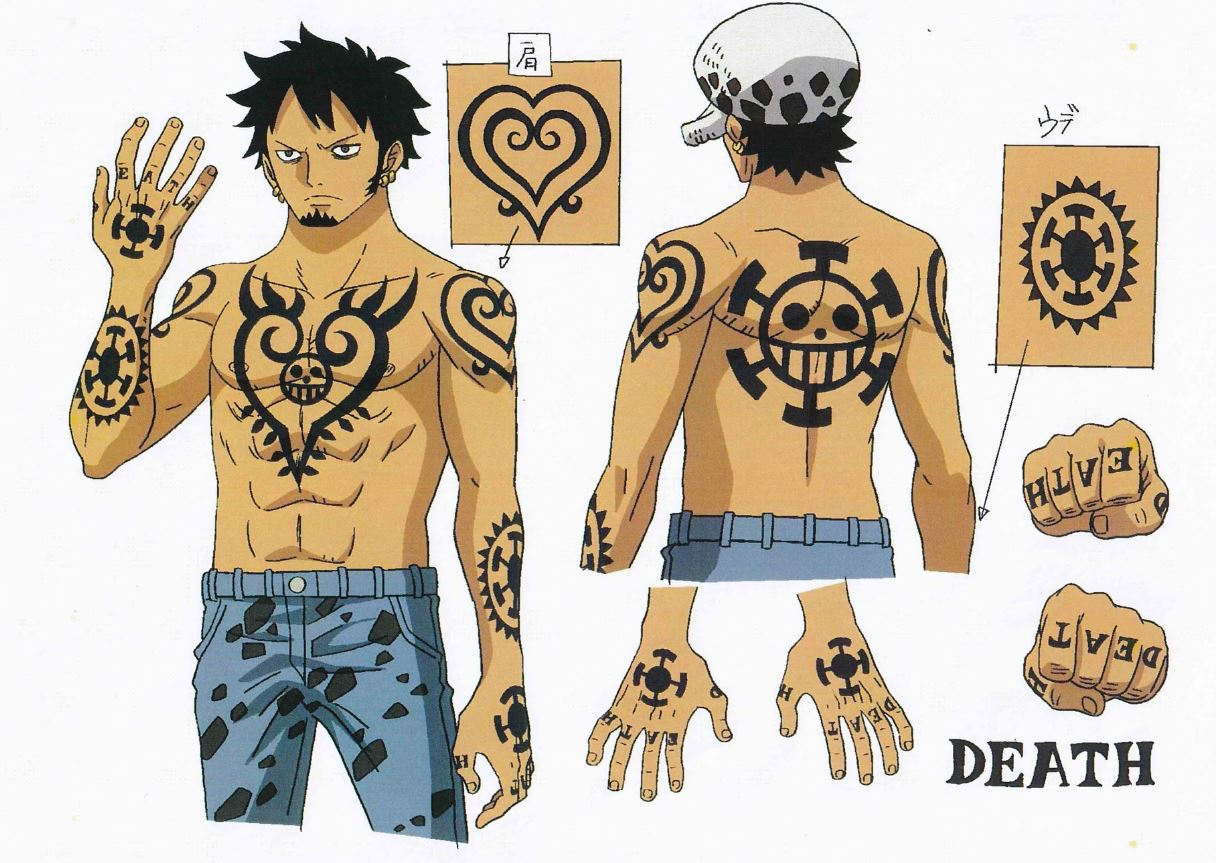
Sizing the Prints
With the patterns in Illustrator, the next important step is to set them to the correct size to print. Since I am using the Inosuke Nendoroid Doll as the base, I took reference to the size of a typical Nendoroid Doll. A Nendoroid Doll’s body height is about 10cm high, according to Good Smile Company. I scaled a reference image using the Ruler tool in Illustrator and then scaled the patterns roughly to fit the image.

Before actually printing on the sticker, I test printed on A4 paper, to test that the scale of the patterns was roughly right.


Once I find the test print good to go, I proceeded to print on the actual stickers.
Water Slide Decal Stickers
I tested my first custom Nendoroid with water slide decal stickers. Considering that printing such custom stickers can be pricey here in Singapore, to make full use of the sticker paper, I laid multiple copies of the same patterns to fit on an A4 paper. I scaled some sets a bit smaller, as different printing shops tend to set the print size differently.

I won’t do a proper tutorial here, because I’m no expert at this. However, I did watch a couple of water slide decal tutorials on YouTube to learn how to apply them. Shared some useful links below.
Just to summarise, I first cut out the stickers manually, as close as possible to the shape of the patterns as possible with a pen knife on a cutting mat. I may have somewhat steady hands from architectural model-making exercises back in my schooling days, but having the stickers laser cut would have been much neater and more accurate.
Next, I put the stickers into lukewarm water for a few seconds, then I slide them onto the Nendoroid Doll surfaces. I use a brush and tweezer to slide the stickers into place. I then dry the sticker with a cotton bud, while gently pushing out any air bubbles. If I need to reposition the stickers, I dap a bit of water again to wet the sticker and shift it.
The Outcome
I think, for a first attempt, my Law came out pretty good.


I don’t have the proper sword and clothes for him, but ignoring this aspect because I’m keeping this exercise low budget, I think he still looks rather good. Just think of it as Law cosplaying Inosuke.
Lessons to Learn & Areas to Improve On
I think it is important to match the color of the Nendoroid Head and Body, especially if sourcing for the different components from different Nendoroids.
The head that I had was in Almond Milk color. However, I suspect that Inosuke has a skin different color. Looking at the unfiltered image below, and in real life, I can’t help but feel that the color of the head is less orange and vibrant as compared to the face. Correct me if I’m wrong, but I think the Peach-colored head would have suited Inosuke’s body better.

Below is a reference to the various colors of the custom head that Good Smile Company had released. The Peach color does look more orange and vibrant than the Almond Milk color.

The other aspect which I feel could be improved is the method of applying the face and body patterns onto the Nendoroid. The cheapest and easiest solution I could think of is to use water slide decal stickers. For quick prototyping, I think this is a very viable approach.
However, if I intend to make better-quality custom stickers, I think I need an alternative. The issue I have with the water slide decal sticker is that it is impossible to manually cut intricate patterns, such as Law’s tattoos, and that the transparent portion of the sticker remains on the Nendoroid.

This is not an issue from far, however, when looked at up close, the reflective sticker becomes very apparent. I’ve seen decal stickers where the transparent portion can be peeled off. This may not be available at my local printing shops, but I believe I can find a source from Tao Bao.

The last issue I have with my final product is the planning of the decal sticker on the back. I don’t know why, but Nendoroid Dolls have a hole on the back for the typical supporting pegs you find on Nendoroids, even though they have magnetic feet and a clamp-like support that does not utilize the hole. Since the decal sticker is transparent, the hole on the back is still visible.

I think it would look so much better if the hole was not there. Maybe I should fill up the hole or print the transparent portion in the same color as the skin.
References
I hope the experience I shared is useful, even though it’s my first attempt. There is definitely more that I can do better. Baby steps.
Nonetheless, there are better tutorials out there. Below are some good tutorials I referenced for the different stages of the process.